Patios are no longer just outdoor slabs. They’ve become extensions of living spaces—used for relaxing, entertaining, dining, and working from home. As homeowners look for ways to upgrade patios without constant repairs or maintenance, epoxy patio flooring is gaining serious attention.
Yet many people hesitate.
Search results are filled with warnings like “epoxy is only for garages” or “epoxy fails outdoors.” The truth is more nuanced. Epoxy patio flooring can last for years outdoors—but only when installed correctly with outdoor-specific methods.
This guide exists because most online articles skip the critical outdoor steps that make epoxy succeed or fail.
In this complete DIY guide, you’ll learn:
- Whether epoxy is right for your patio
- Which epoxy systems work outdoors
- How to prepare a patio surface properly
- Step-by-step installation instructions
- How to prevent peeling, yellowing, and slipperiness
- Maintenance tips to extend lifespan
This is written for homeowners who want real results, not shortcuts.
1. Is Epoxy Flooring a Good Choice for Patios?
Epoxy flooring can be an excellent patio surface when applied over a solid, well-prepared base and protected from UV exposure.
Best Patio Conditions for Epoxy
- Concrete patios in good structural condition
- Covered or partially covered patios
- Flat or gently sloped surfaces
- Areas with good drainage
When Epoxy Is Not Ideal
- Severely cracked or shifting concrete
- Constant standing water
- Fully exposed patios without UV protection
- Extremely cold freeze-thaw regions without expansion control
Understanding your patio conditions before starting prevents premature failure.
2. Benefits of Epoxy Patio Flooring
When done right, epoxy offers benefits that traditional patio surfaces struggle to match.
Key Advantages
- Seamless, modern appearance
- Waterproof and moisture-resistant
- Easy to clean and sanitize
- Weed-free surface
- Custom colors and textures
- Strong adhesion to concrete
- Resistant to stains and outdoor spills
Epoxy patios are especially popular for homeowners who want a clean, contemporary look without grout lines or joints.
3. Choosing the Right Epoxy System for Outdoor Patios
Not all epoxy products are suitable for outdoor use.
Essential Requirements
- Moisture-tolerant primer
- High-solids epoxy base coat
- UV-resistant clear topcoat
- Anti-slip texture additive
Indoor-only epoxy systems almost always fail outdoors.
Recommended Finishes
- Satin or matte finish
- Decorative flake systems
- Stone-look aggregate epoxy
- Light colors to reduce heat absorption
Avoid glossy finishes outdoors due to slip risk.
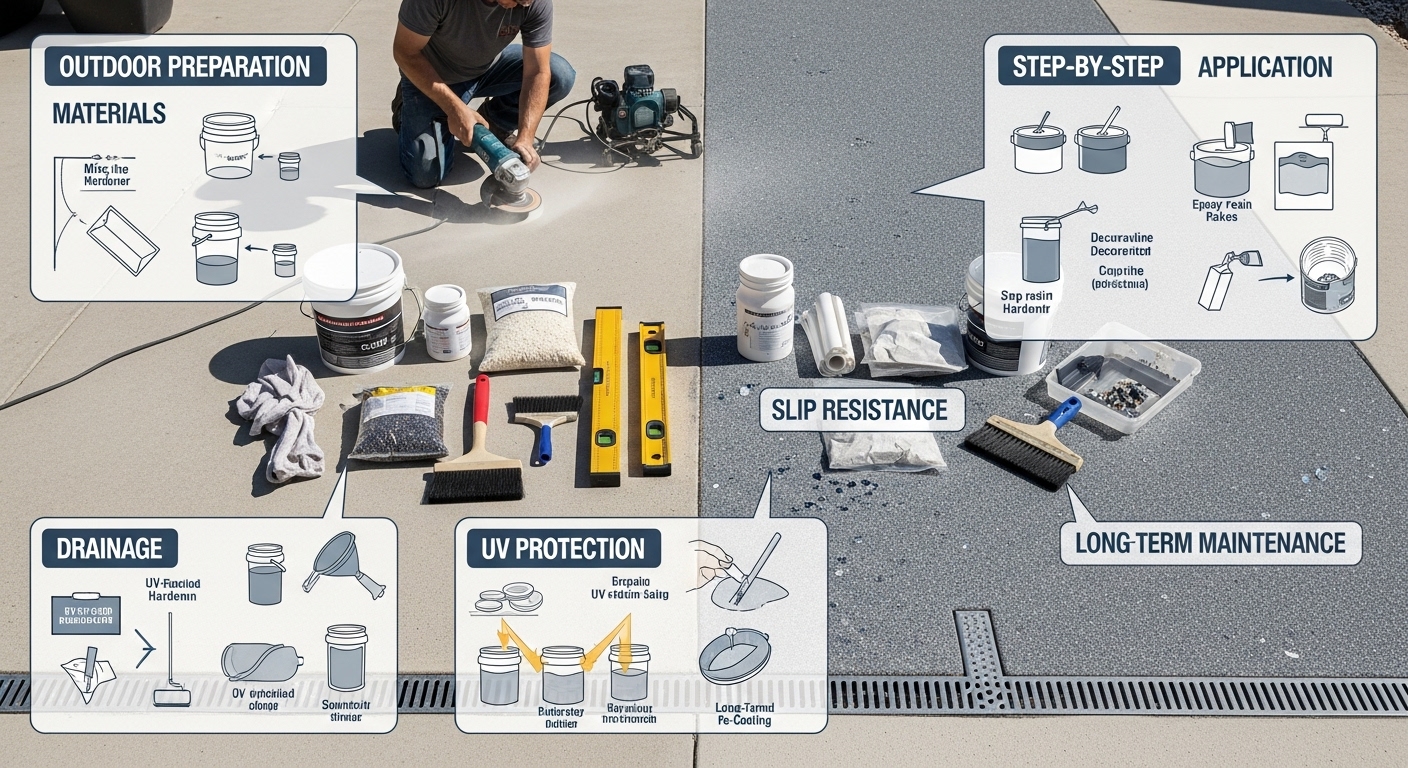
4. Tools and Materials You Will Need
Materials
- Outdoor-rated epoxy resin system
- Moisture-blocking concrete primer
- UV-stable protective topcoat
- Anti-slip aggregate
- Concrete crack filler or patching compound
- Mild detergent and clean water
Tools
- Pressure washer or stiff broom
- Concrete grinder or sanding tool
- Vacuum
- Mixing buckets
- Drill with mixing paddle
- Squeegee
- Epoxy roller
- Paint tray
- Protective gloves and eyewear
5. Inspecting and Evaluating Your Patio
Before touching any epoxy, inspect your patio carefully.
Check for Structural Issues
- Large cracks
- Uneven settling
- Spalling or crumbling concrete
Epoxy is a coating—not a structural repair.
Drainage Check
- Water should not pool
- Patio should slope slightly away from the home
- Fix drainage problems first
Ignoring these issues guarantees failure.
6. Surface Preparation (The Most Important Step)
Outdoor epoxy success depends heavily on preparation.
Step 1: Deep Cleaning
- Remove furniture and debris
- Pressure wash or scrub with detergent
- Remove grease, algae, and stains
- Rinse thoroughly and let dry completely
Step 2: Repair Damage
- Fill cracks with concrete repair compound
- Patch chips and surface defects
- Allow repairs to cure fully
Step 3: Mechanical Profiling
- Grind or sand the surface
- Concrete should feel rough like medium sandpaper
- This creates mechanical grip for epoxy
Step 4: Final Cleaning
- Vacuum all dust
- Wipe surface clean
- Ensure no moisture remains
Skipping any of these steps drastically reduces adhesion.
7. Moisture Testing for Outdoor Patios
Moisture is epoxy’s biggest enemy.
Simple Moisture Test
- Tape plastic sheet to patio overnight
- Check for condensation underneath
- Moisture means epoxy cannot be applied yet
If moisture is present, improve drainage or use moisture-blocking primer.
8. Applying the Primer Coat
Primer seals concrete and improves adhesion.
Primer Application Steps
- Mix primer as directed
- Pour onto patio in sections
- Roll evenly using epoxy roller
- Avoid puddles
- Allow to cure according to instructions
Do not rush this stage.
9. Mixing Epoxy Resin Correctly
Improper mixing causes sticky or soft floors.
Mixing Best Practices
- Measure resin and hardener precisely
- Mix slowly to avoid air bubbles
- Scrape bucket sides and bottom
- Mix for full recommended time
- Only mix small batches
Never eyeball measurements.
10. Applying the Epoxy Base Coat
Step 1: Pour the Epoxy
Pour epoxy in ribbons or small pools on the patio.
Step 2: Spread with Squeegee
Use a squeegee to distribute epoxy evenly.
Step 3: Back-Roll
Roll over the surface to smooth lines and even thickness.
Step 4: Add Texture
While epoxy is wet, broadcast anti-slip aggregate evenly.
This step is critical for outdoor safety.
11. Curing Time and Weather Protection
Typical Cure Timeline
- Touch dry: 8–12 hours
- Light foot traffic: 24 hours
- Full cure: 72 hours or longer
Curing Tips
- Protect from rain
- Avoid direct sun during early curing
- Maintain stable temperature
- Do not rush usage
Cover patio with breathable protection if needed.
12. Applying the UV-Resistant Topcoat
Outdoor epoxy must be sealed.
Why Topcoat Matters
- Prevents yellowing
- Protects against UV damage
- Improves abrasion resistance
- Seals anti-slip texture
Apply topcoat evenly using a roller. Avoid thick coats.
13. Edge Detailing and Transitions
Edges prevent water intrusion and peeling.
Edge Options
- Clean epoxy edge
- Decorative stone borders
- Metal or composite edging
- Step nosing for elevated patios
Seal edges carefully.
14. Common Epoxy Patio Problems and How to Avoid Them
Peeling
- Caused by poor prep or moisture
- Prevented with grinding and primer
Yellowing
- Caused by UV exposure
- Prevented with UV-stable topcoat
Slippery Surface
- Caused by glossy finish
- Prevented with texture additives
Bubbles
- Caused by trapped air or heat
- Prevented by proper timing and rolling
15. Long-Term Maintenance for Epoxy Patio Floors
Epoxy patios are low maintenance but not zero maintenance.
Maintenance Tips
- Sweep regularly
- Rinse with water as needed
- Use mild cleaners only
- Avoid metal shovels or sharp tools
- Reapply topcoat every few years if exposed
16. Cost Expectations for DIY Epoxy Patio Flooring
Cost Factors
- Patio size
- Surface repairs
- Epoxy system quality
- Texture and finish
DIY epoxy patios are generally far more affordable than tile or stone installations.
17. Is DIY Epoxy Patio Flooring Worth It?
For homeowners who value:
- Clean aesthetics
- Low maintenance
- Waterproof surfaces
- DIY control over design
Epoxy patio flooring is absolutely worth it—when installed correctly.
The key is respecting preparation, moisture control, and outdoor-specific materials.
Conclusion
Epoxy patio flooring transforms ordinary concrete patios into durable, modern outdoor living spaces. While epoxy has a reputation for failure outdoors, those failures almost always come from skipping critical steps—not from the material itself.
By following this step-by-step guide, homeowners can confidently install epoxy patio flooring that resists weather, looks professional, and lasts for years. Preparation, patience, and protection are the foundations of success.
Done right, an epoxy patio floor doesn’t just upgrade your patio—it upgrades how you use your outdoor space.