Garden pathways are no longer just functional walkways. In modern home landscaping, they serve as visual anchors that guide movement, define spaces, and elevate outdoor design. While traditional materials like concrete pavers, gravel, or stone are common, many homeowners are now searching for cleaner, low-maintenance, and longer-lasting alternatives.
Epoxy resin flooring is emerging as a powerful solution for simple garden pathways, especially in residential backyards, side yards, patios, and courtyard gardens. It creates a seamless, durable surface that resists water, weeds, cracking, and erosion—problems that plague traditional garden paths.
However, outdoor epoxy applications are often misunderstood. Many guides focus only on garages or interiors, leaving homeowners confused about whether epoxy can work outdoors and how to install it correctly.
This guide fills that gap.
You’ll learn exactly how to design, prepare, and install a simple garden pathway using epoxy resin flooring, step by step, using DIY-friendly methods that work in real outdoor conditions.
1. Why Choose Epoxy Resin for a Garden Pathway?
Epoxy resin flooring offers several advantages over traditional garden path materials when installed correctly.
Key Benefits for Outdoor Garden Paths
- Seamless, modern appearance
- Weed-resistant surface
- Excellent water resistance
- Easy to clean with minimal upkeep
- Customizable color and texture
- Strong adhesion to concrete or stone bases
- Long lifespan when sealed properly
Unlike loose gravel or pavers, epoxy pathways do not shift, sink, or allow weeds to grow through joints.
2. Where Epoxy Garden Pathways Work Best
Epoxy resin flooring is best suited for simple garden pathways rather than heavy-load driveways.
Ideal Locations
- Backyard walking paths
- Side yard pathways
- Courtyard garden walkways
- Patio-to-garden transitions
- Greenhouse or shed access paths
- Decorative landscape trails
Not Recommended For
- Steep slopes without texture
- Areas with heavy vehicle traffic
- Constant standing water zones
Choosing the right location ensures durability and safety.
3. Planning Your Garden Pathway Design
A simple design works best for epoxy pathways.
Recommended Path Width
- 24–30 inches for foot traffic
- 36 inches for wheelbarrows or carts
Common Layout Styles
- Straight minimalist paths
- Gentle curves following landscaping
- Border-defined walkways between lawn and garden beds
Color and Finish Options
- Neutral earth tones
- Light gray or beige for heat control
- Stone-look epoxy with decorative aggregates
- Matte or satin finish for outdoor safety
Avoid glossy finishes outdoors, as they can become slippery when wet.
4. Tools and Materials You Will Need
Materials
- Outdoor-rated epoxy resin system
- Concrete primer (moisture-tolerant)
- UV-resistant clear topcoat
- Anti-slip aggregate or texture additive
- Concrete patching compound
- Clean water and mild detergent
Tools
- Shovel and rake
- Level
- Concrete trowel
- Mixing buckets
- Drill with mixing paddle
- Squeegee
- Epoxy roller
- Protective gloves and eyewear
5. Preparing the Base (Critical for Outdoor Success)
Epoxy resin must be applied over a solid base. It cannot be applied directly over soil.
Best Base Options
- Existing concrete path
- Newly poured concrete slab
- Mortar-set stone base
- Cement screed over compacted gravel
6. Step-by-Step Base Preparation
Step 1: Clear the Area
Remove grass, roots, rocks, and debris. Ensure the path outline is clearly defined.
Step 2: Level the Ground
Excavate to a depth of 4–6 inches if pouring new concrete. Compact the soil thoroughly.
Step 3: Install a Concrete Base (If Needed)
- Pour concrete evenly
- Maintain slight slope for drainage
- Allow concrete to cure for at least 28 days
Step 4: Repair and Smooth
Fill cracks or holes with patching compound. Smooth rough spots.
Step 5: Clean Thoroughly
Wash the surface with water and mild detergent. Allow it to dry completely.
7. Moisture and Drainage Considerations
Outdoor epoxy pathways fail most often due to moisture issues.
Important Checks
- No standing water on the surface
- Concrete must be fully cured
- Avoid installation during rainy periods
- Perform a moisture test by taping plastic overnight
If moisture is present, address drainage before continuing.
8. Applying the Primer Coat
Primer ensures proper adhesion and seals the surface.
Step-by-Step Primer Application
- Mix primer according to instructions
- Pour onto surface in sections
- Spread with roller evenly
- Allow to cure as directed (usually 6–12 hours)
Do not skip this step for outdoor applications.
9. Mixing the Epoxy Resin Correctly
Improper mixing is a common cause of failure.
Best Practices
- Measure resin and hardener accurately
- Mix slowly to avoid air bubbles
- Scrape sides and bottom of container
- Only mix what you can apply within pot life
Always follow manufacturer ratios precisely.
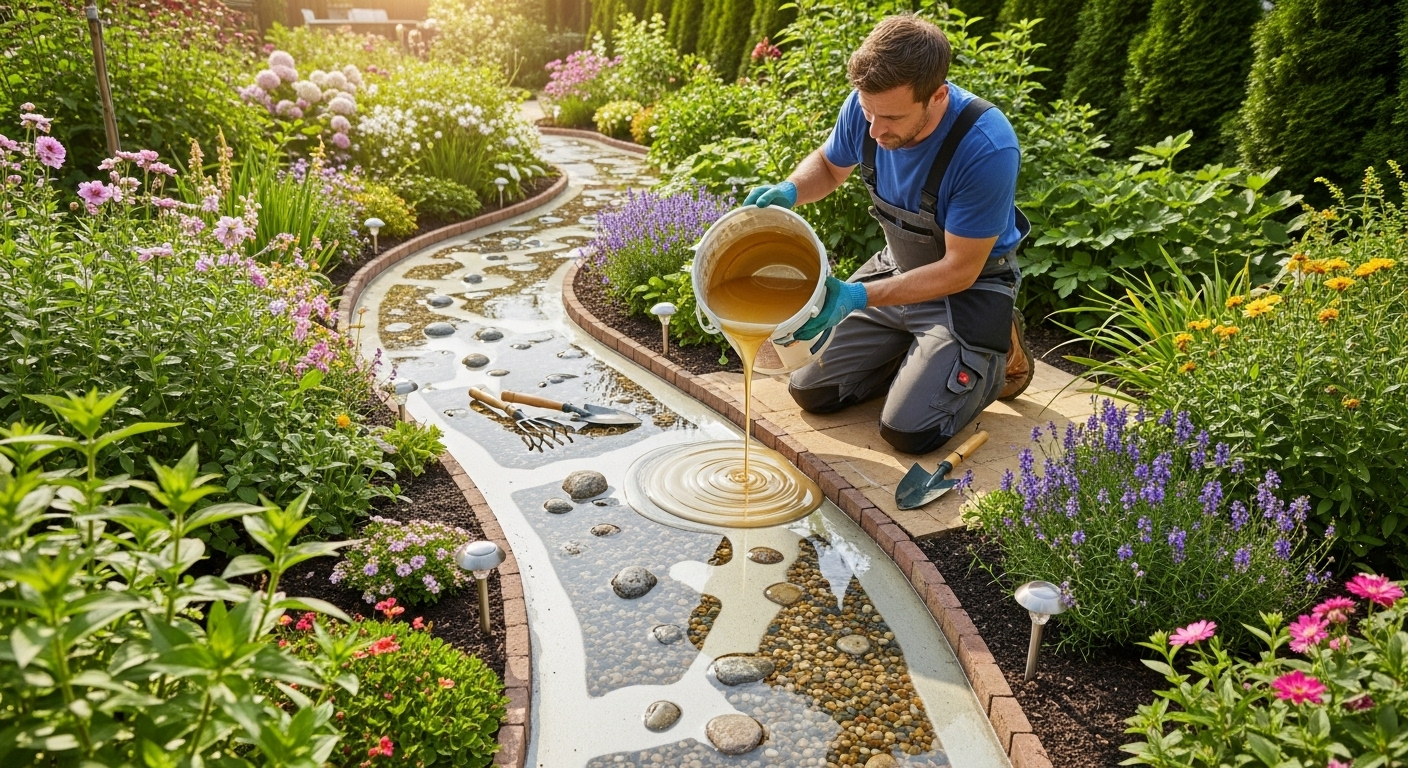
10. Applying the Epoxy Resin Layer
Step 1: Pour the Epoxy
Pour epoxy directly onto the primed surface in small sections.
Step 2: Spread Evenly
Use a squeegee to distribute epoxy evenly across the pathway.
Step 3: Roll for Texture
Back-roll with an epoxy roller to remove lines and ensure consistent thickness.
Step 4: Add Anti-Slip Texture
While epoxy is wet, broadcast anti-slip aggregate evenly.
This step is essential for outdoor safety.
11. Curing the Epoxy Pathway
Typical Curing Timeline
- Light foot traffic: 24 hours
- Full cure: 72 hours or more
- Avoid heavy use for at least 5 days
Curing Tips
- Protect from rain
- Avoid direct sunlight during early curing
- Maintain stable temperature
12. Applying a UV-Resistant Topcoat
Outdoor epoxy must be sealed.
Why a Topcoat Is Necessary
- Prevents yellowing
- Adds weather resistance
- Improves abrasion resistance
- Locks in texture
Apply the topcoat using a roller in thin, even layers.
13. Edge Finishing for a Clean Look
Clean edges improve appearance and durability.
Edge Options
- Flush epoxy edge
- Metal or plastic edging
- Stone or brick borders
Ensure edges are sealed to prevent water intrusion.
14. Common Mistakes to Avoid
- Applying epoxy directly over soil
- Skipping primer or topcoat
- Using indoor epoxy outdoors
- Applying during high humidity
- Choosing glossy finishes
- Ignoring drainage slope
Avoiding these mistakes significantly extends lifespan.
15. Long-Term Maintenance of Epoxy Garden Pathways
Epoxy pathways require minimal care.
Maintenance Tips
- Sweep regularly
- Rinse with water as needed
- Use mild cleaners only
- Reapply topcoat every few years if exposed to sun
16. Cost Expectations
DIY epoxy garden pathways are cost-effective.
Typical Cost Factors
- Path length and width
- Epoxy system quality
- Base preparation needs
- Texture and finish choices
DIY installation typically costs far less than stone or pavers.
17. Is an Epoxy Garden Pathway Worth It?
For homeowners seeking a simple, modern, low-maintenance garden walkway, epoxy resin flooring is a smart solution when installed correctly over a solid base.
It eliminates weeds, resists weather damage, and enhances landscape design while remaining accessible for DIY projects.
Conclusion
A simple garden pathway made with epoxy resin flooring combines durability, functionality, and modern aesthetics in a way few materials can match. By focusing on proper base preparation, moisture control, and outdoor-rated materials, homeowners can create a seamless garden path that lasts for years with minimal maintenance.
This step-by-step guide provides everything needed to complete the project confidently and correctly. When done right, an epoxy resin garden pathway becomes more than a walkway—it becomes a lasting part of your outdoor living space.