Epoxy resin flooring is marketed as a “set it and forget it” solution—but many homeowners quickly realize that epoxy floors can develop issues if even one step in the installation process goes wrong. From bubbling and peeling to discoloration and cracking, epoxy floor problems are more common than most guides admit.
What makes this frustrating is that many online results either blame the user without offering solutions or suggest expensive professional repairs without explaining DIY options.
This guide is different.
This is a problem-solving, step-by-step repair guide written specifically for DIY homeowners. You’ll learn why epoxy floors fail, how to diagnose each issue correctly, and exactly how to fix it yourself without tearing out the entire floor.
1. Why Epoxy Floors Fail (The Real Reasons)
Before fixing epoxy floor problems, you must understand their root causes. Most epoxy failures happen due to process errors, not product quality.
Common Root Causes
- Improper surface preparation
- Moisture trapped in concrete
- Incorrect mixing ratios
- Applying epoxy in wrong temperatures
- Poor ventilation during curing
- Skipping primer or topcoat
- Rushing curing times
Fixing epoxy problems without understanding the cause often leads to repeat failures.
2. How to Identify the Type of Epoxy Floor Problem
Not all epoxy issues are the same. Correct identification saves time and money.
Visual Diagnosis Guide
- Small round bubbles: Outgassing or trapped air
- Peeling sheets: Adhesion failure
- Sticky or soft spots: Improper curing
- Yellow tint: UV exposure or chemical reaction
- Hairline cracks: Subfloor movement
- Cloudy finish: Moisture contamination
Once you identify the issue, move to the relevant fix below.
3. How to Fix Epoxy Floor Bubbles (Most Common Issue)
Why Bubbles Happen
Bubbles form when air or moisture escapes from concrete during curing. This is called outgassing.
DIY Fix for Existing Bubbles
Step 1: Sand the Affected Area
- Use 120–220 grit sandpaper
- Sand until bubbles are flattened
- Vacuum dust completely
Step 2: Clean the Surface
- Wipe with a lint-free cloth
- Ensure no residue remains
Step 3: Apply a Thin Epoxy Patch Coat
- Mix a small batch of epoxy
- Use a roller to recoat the area
- Feather edges to blend seamlessly
How to Prevent Future Bubbles
- Apply epoxy in the late afternoon (concrete cooling)
- Use a primer coat
- Avoid hot temperatures
- Roll slowly to avoid air entrapment
4. How to Fix Peeling or Lifting Epoxy Floors
Why Epoxy Peels
Peeling means the epoxy never bonded properly to the concrete.
Common causes:
- Oil or grease contamination
- Smooth concrete surface
- Moisture vapor pressure
- Old sealers not removed
DIY Repair Steps
Step 1: Remove Loose Epoxy
- Scrape or grind all peeling sections
- Do not coat over failing epoxy
Step 2: Grind the Concrete
- Create a rough surface profile
- Concrete should feel like medium sandpaper
Step 3: Moisture Test
- Tape plastic sheet overnight
- If condensation forms, address moisture first
Step 4: Reapply Epoxy
- Apply primer first
- Follow with base coat and topcoat
Important Note
If more than 40% of the floor is peeling, full removal is recommended.
5. How to Fix Sticky or Soft Epoxy Floors
Why Epoxy Stays Soft
This happens when epoxy doesn’t chemically cure.
Typical reasons:
- Wrong resin-to-hardener ratio
- Poor mixing
- Cold temperatures during curing
DIY Fix Options
Option 1: Partial Soft Spots
- Scrape off soft epoxy
- Clean thoroughly
- Recoat with correctly mixed epoxy
Option 2: Entire Floor Is Soft
- Unfortunately, this requires removal
- Epoxy cannot “re-harden” once failed
Prevention Tips
- Measure accurately
- Mix for full recommended time
- Maintain proper temperature for 72 hours
6. How to Fix Epoxy Floor Cracks
Why Cracks Appear
Epoxy mirrors the movement of the concrete below.
Common reasons:
- Foundation settling
- Expansion and contraction
- Existing concrete cracks not treated
DIY Crack Repair Process
Step 1: Open the Crack
- Use a grinder or chisel
- Create a clean channel
Step 2: Fill with Flexible Filler
- Use epoxy crack filler
- Allow full cure
Step 3: Sand Smooth
- Level the surface
- Remove excess filler
Step 4: Recoat Area
- Apply epoxy patch coat
- Blend edges carefully
Important
Structural cracks will reappear unless the concrete movement is resolved.
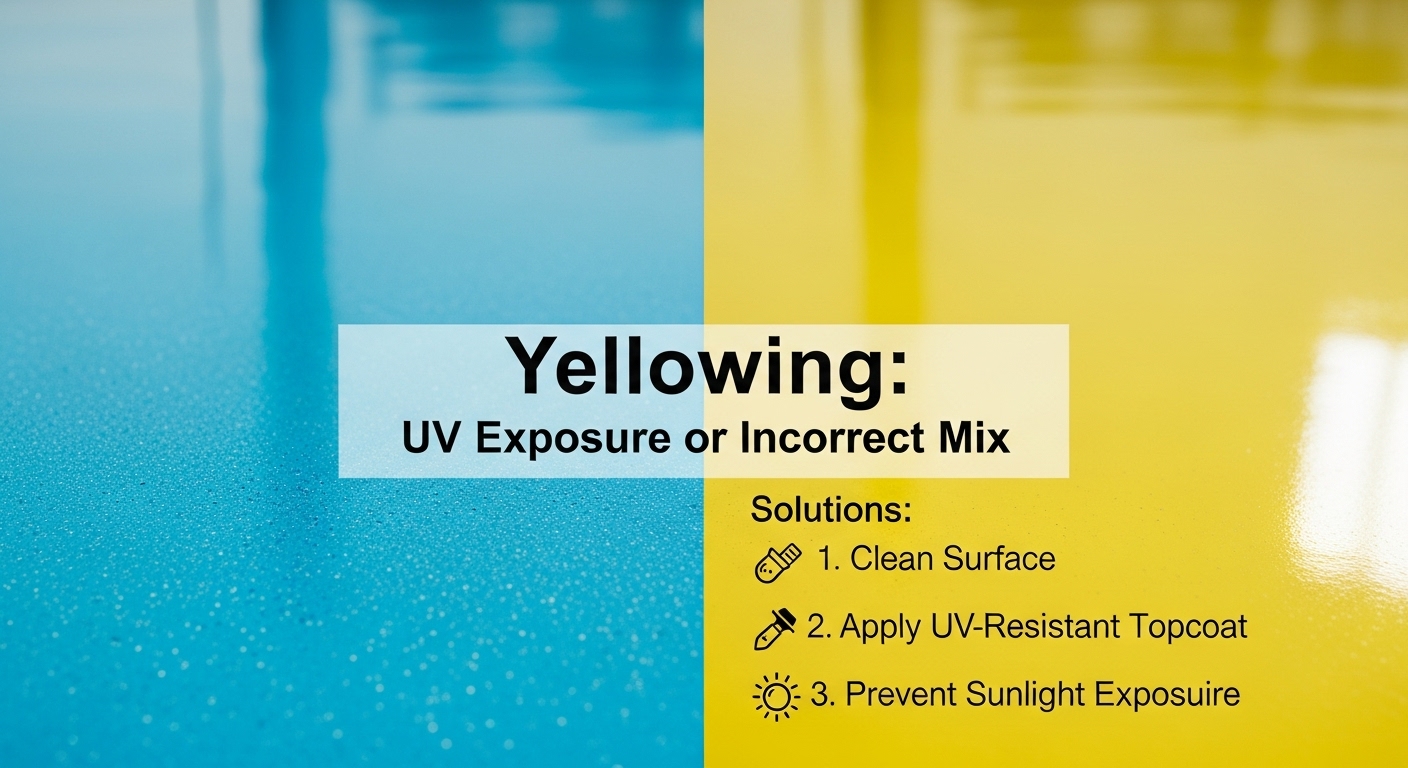
7. How to Fix Yellowing Epoxy Floors
Why Epoxy Turns Yellow
Epoxy is sensitive to UV exposure.
Common locations affected:
- Garages with sunlight
- Patios and porches
- Rooms with large windows
DIY Solution
Step 1: Light Sanding
- Sand yellowed surface lightly
- Remove oxidized layer
Step 2: Apply UV-Resistant Topcoat
- Use a clear protective coat
- This restores clarity and protects color
Prevention
- Always use UV-stable topcoat
- Avoid direct sunlight during curing
8. How to Fix Cloudy or Milky Epoxy Floors
Why Cloudiness Occurs
- Moisture in concrete
- High humidity
- Applying epoxy on damp surface
DIY Fix Steps
Step 1: Allow Full Cure
- Sometimes cloudiness disappears as epoxy dries
Step 2: Sand and Recoat
- If permanent, sand surface
- Apply new epoxy layer in dry conditions
Prevention Tips
- Check humidity before application
- Avoid rainy days
- Use moisture barrier primer if needed
9. How to Repair Uneven or Roller Marks
Why It Happens
- Epoxy applied too thick
- Inconsistent rolling technique
- Working past pot life
DIY Fix
Step 1: Sand High Spots
- Use fine grit sandpaper
- Focus on raised ridges
Step 2: Clean Thoroughly
- Remove dust completely
Step 3: Apply Leveling Coat
- Thin epoxy layer
- Roll in one direction, then cross-roll
10. When Epoxy Floor Repair Is NOT Worth It
Sometimes repair costs exceed replacement value.
Consider Full Removal If:
- Epoxy is soft across entire floor
- Severe peeling in multiple areas
- Moisture issues remain unresolved
- Incorrect epoxy product used originally
11. How to Prevent Epoxy Floor Problems Long-Term
Best Practices Checklist
- Grind concrete, don’t just clean it
- Always use primer
- Measure epoxy precisely
- Mix slowly and thoroughly
- Control temperature and humidity
- Respect curing times
- Use protective topcoat
12. Safety Tips During Repairs
- Wear gloves and eye protection
- Ensure ventilation
- Avoid skin contact with uncured epoxy
- Keep pets and children away during curing
13. Cost Comparison: DIY Repair vs Replacement
| Issue Type | DIY Repair Cost | Full Replacement |
|---|---|---|
| Small bubbles | Low | High |
| Peeling sections | Medium | High |
| Sticky epoxy | High | Required |
| Yellowing | Low | Medium |
DIY repairs can save thousands when done correctly.
Conclusion
Epoxy floor problems can be intimidating—but most are fixable without professional intervention when diagnosed correctly. The key is understanding the root cause, not just covering up visible damage.
With patience, proper surface prep, and correct materials, DIY homeowners can restore epoxy floors to near-perfect condition. Use this guide as a reference whenever issues appear, and you’ll avoid repeating mistakes that cause long-term failure.
Epoxy flooring rewards precision. Fix it right once, and it will last for years.